Table of Contents
Page 1: Tibialis Posterior Tendonitis Rehab: Introduction
Page 2: Posterior Tibial Insufficiency Treatment (1): Leg Realignment
Page 3: Posterior Tibial Insufficiency Treatment (2): Exercises
(<<< You are here)
Page 4: Posterior Tibial Tendonitis Treatment: Trigger Point Massage
Page 5: Posterior Tibial Insufficiency Treatment
(4): Postural Realignment Made Easy!
Contents, this page
1. Posterior Tibial Realignment Using The Rubber Tube
2. Posterior Tibial Realignment When Placing a Foot Forward
3. Posterior Tibial Realignment when Sitting Down
4. Posterior Tibial Realignment When Walking
5. Posterior Tibial Realignment When Standing on the Toes
6. Posterior Tibial Realignment When Cycling
* Note for Sufferers of Plantar Fasciitis and Iliotibial Band Syndrome
* Likelihood of Success by Posture & Alignment Exercise & Rehab
Exercises For Realigning The Entire Leg To Correct A "Weak" Posterior Tibial Tendon
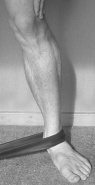
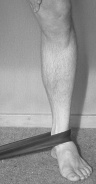
1. Posterior Tibial Realignment Using The Rubber Tube
Action
- Place the fingers outside of the knee, and encourage the knee to move to the side,
while at the same time lifting the foot arch and leaving all toes on the ground.
- Slowly and smoothly, return to the start position.
Repeat a maximum of 6 times. After more that six times, you will lose concentration,
and there will be no further gain.
The power of this exercise is not so much in strengthening the muscle, but rather,
in programming healthy pattern of alignment. This pattern will now be applied
to a number of daily activities.
|
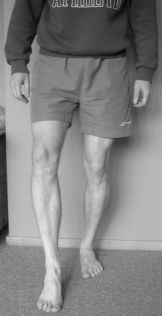
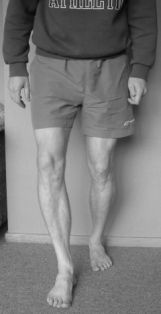
Picture 15:
Perform this exercise in the same way as the exploratory exercise depicted earlier in this article.
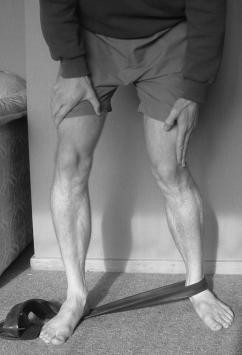
Pictures 16 and 17:
Moving from the old and failed alignment Strategy to the New and Better Strategy.
|
2. Posterior Tibial Realignment When Placing a Foot Forward
Left Picture(18): The balls of the toes land before the heel. Note that this is a balanced landing
in that all the balls of the toes are landing at the same time.
Right Picture (19): the body comes over the foot and the heel lands last. Weight is spread
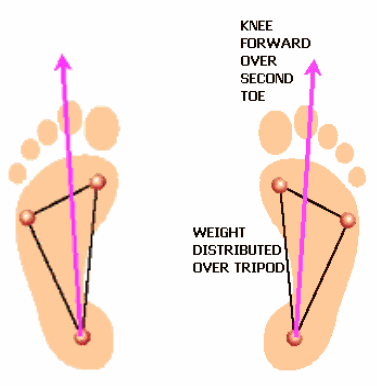
evenly over the three points of the "foot tripod".
Lower Picture (20): When weight is spread evenly over the "Foot tripod", at the same
time as keeping the knee outward, the alignment is optimised, and the muscles of
the buttock, thigh and lower leg contract as they were designed to do.
In both pictures, the knees do not lock, but rather remain slightly bent. This
makes it possible for the thigh bone to rotate outward and the kneecap to look
outward. Also, the torso is leaning slightly forward. This enables the foot to
land on the balls of the toes first. Landing on the balls of the toes activates
the "lazy team member" muscles of the calf and the sole of the foot.
For elderly folk with Tibialis posterior Tendonitis/Insufficiency, this may be
something you have never experienced in 60 years plus of living. It will therefore
feel strange, and very possibly exquisitely difficult! You need to have an open
mind and a lot of determination to change the postural faults of a life time.
That is why I have taken great care to explain why you need to do what I am recommending you to do.
|
|
Pictures 18 and 19:
Placing the Foot
|
|
|
Picture 20: The Foot Tripod
|
|
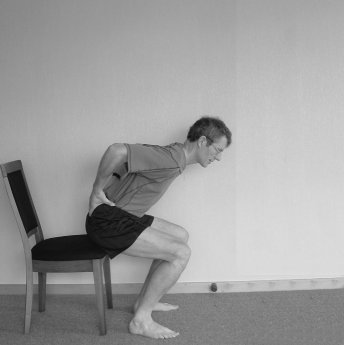
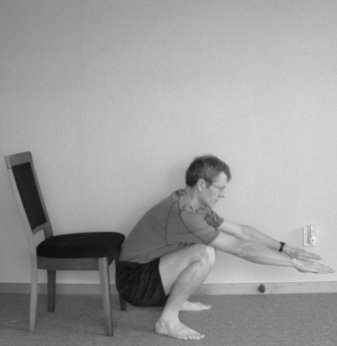
3. Posterior Tibial Realignment when Sitting Down
The pictures show how the act of sitting into a chair is the same as the first half of squatting
down into the deep (or latrine) squat. We westerners do not have the benefits of daily latrine
squatting to remind our leg muscles how they should work together as a team. We can however
learn to use the act of sitting down as a drill in "leg muscle team work".
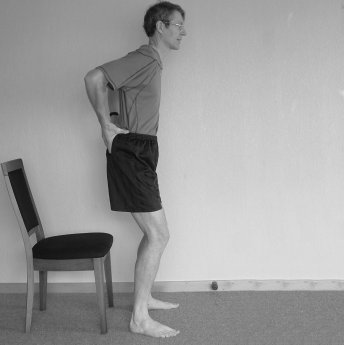
Picture 21: The hands are placed with the fingers over the gluteal muscles to check that
they engage. The knees and hips are slightly bent, and the knees are squinting outwards.
Picture 22: Tummy in, clench the buttocks, and (with the spine remaining comfortably straight),
slowly lower into the seat. Pause frequently on the way down to check that the buttocks
remain firm, and the knees come forward in a line over the second to third toe (it's a long way down!).
Picture 23: The deep squat is just a continuation of sitting down, but with the chair
removed out of the way.
Note: You do not have to perform the deep squat (although
it is beneficial for those who can). You do have to see the continuity of this style
of sitting down with the action of deep squatting.
Modification: Have a table in front of you and the chair. Place your hands on the table for support.
Repetitions: Lower and rise out of the chair 3 to 6 times with the "buttocks
clenched and tummy in". Repeat 2 to 4 times but this time maintain the same
pattern of movement with as little "buttocks clenched and tummy in" as possible.
Look for a feeling of effortlessness!
|
Pictures 21 to 23: The Stand to Sit Movement
|
4. Posterior Tibial Realignment When Walking
|
Comment:
Initially you will feel like a bandy legged cowboy. ("Howdy Pardner!").
Preparation:
For correct alignment and protection of joints, the buttock of the forward leg should
gently clench during the moment that the foot lands on the ground. Monitor for this by
placing the hands on the buttocks. Hips and knees slightly bent. Bring your knees
forward over the second to third toes.
Action:
With "tummy in", take a very slow step forward. Clench the buttock as you step
forward to place the balls of the toes on the ground.
Place equal weight over the ball of the big toe and the ball of the little toe.
Once the front foot is fully weight bearing, relax the buttocks. Repeat the cycle
as you take another step.
Repetitions:
A total of 6 steps with strong gluteal engagement is sufficient. Repeat for perhaps
20 steps with the same foot placement and with minimal buttock clenching. Seek to
achieve the same leg and foot alignment with minimal tension. Work toward making this a habit.
|
Picture 24: Preparing to Walk.
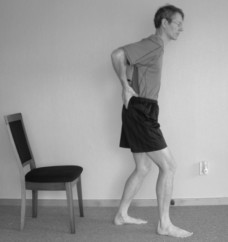
Picture 25: Taking a Step.
|
5. Posterior Tibial Realignment When Standing on the Toes
Note: Initially, place your hands on the back of two chairs for support and to
aid your balance. As you improve, progress to one hand on a wall, and then to free standing as in the diagram.
Take your shoes and socks off, and stand in front of a full length mirror for this exercise.
- Stand with your heels just off the ground
and your weight equally distributed over the balls of your toes, and your toes
(that is five toes and five balls of toes for each foot - a total of 20 points of contact with the ground).
- Bend at the hip and knee joints, engage your gluteal muscles, and "squint your kneecaps outward"
so that they are looking over the line of the third toe (you will feel like a bandy-legged cowboy).
- Stand equally on both feet, and balance for five seconds!
- Lift your left foot slightly off the ground, and balance for five seconds!
- Lift your right foot slightly off the ground, and balance for five seconds!
Checklist:
- Gluteal muscles engaged and kneecaps looking outward over second toe.
- Weight equally spread over five toes and five balls of toes for each foot.
This exercise will be undoing the postural habits of a life time. Expect it to
feel strange and uncomfortable. Expect your foot and leg stabilizer muscles to
tire rapidly and become painful. Small doses of this exercise throughout the day
will be required. You will need to persevere.
| |
Pictures 26 and 27:
Balancing with heels just off the ground.
|
6. Posterior Tibial Realignment When Cycling
- Place the balls of the toes on the peddles.
- Make sure that the feet are pointing directly ahead.
- Make sure that the knees are directly over the second or third toes.
- Make sure that the foot arch is lifting as described above under "Placing a Foot Forward".
- Peddle gently and pay attention to leg alignment.
Note for Sufferers of Plantar Fasciitis and Iliotibial Band Syndrome
This article was written especially for those with Tibialis-posterior Tendonitis/Insufficiency.
But the same exercises would apply for those with "Iliotibial band Syndrome", "Plantar fasciitis",
and to some extent patellofemoral syndrome because the same faults of leg alignment, muscle
recruitment and weighting of the foot exist.
Likelihood of Success by Posture & Alignment Exercise & Rehab
Stage I cases (moderate severity), the success rate is quoted to be approximately 80%(3),
with only one of 28 patients requesting surgery. When necessary, surgery is a highly
effective option(4), but should not be used as a stand alone treatment, since it will
not correct the posture and alignment causes of posterior tibial insufficiency/tendonitis.
Return to Top
|
|
|